Tammy at Creative Critters Cricut Club has shared her ribbon storage and is asking others to share theirs. So, I thought I would join the fun.
I like to have my ribbon portable so that I can grab it and take it to crops. Therefore, the racks or rain gutter type storage doesn't work for me. I tried the little craft boxes with the individual flat cards like I stored embroidery floss on years ago, but that just downright drove me crazy. When I only had a little bit of ribbon, I looped it on a ring and hung it from a hook. But that didn't work when my supply grew.
Now I use the ribbon wrap cards from Magistical Memories. They're made for 1/2", 3/4", 1" and 1 1/2" widths. Each package comes with 8 cards. I use these for ribbon by the yard or a whole roll. I need it all together in one place.
I've been using this system for several years now and haven't felt the need to change, so it must be working. I can either grab the whole box or just some select cards and off I go.
I usually wait for an abundance of new ribbon and sit in the recliner watching tv as I wrap it on the cards and use straight pins to secure. As a matter of fact, it's probably time for a ribbon wrapping session. I'll have to go to a second box with the additional ribbon.
Some ribbon does need to be ironed when I use it, but that's no problem with the little iron Virginia gave me for my birthday a few years ago. Thanks, V! Wow! That was 3 years ago, so I have been using this system for a good while.
How do you store your ribbon?
Jill
Wednesday, June 30, 2010
Tuesday, June 29, 2010
Scoring, Cable & Celebrate
Several things going on today.
SCORING
I'll start with scoring. Have you seen Diane's post about the Martha Stewart Score Board? She gives a review on it and is giving one away! I've wanted a Scor-Pal for some time but couldn't ever bring myself to order it. When I read her review, saw the price on it and knew that I had a Michaels coupon in the car, I was sold. I bought one on the way home today. $12.95 with coupon and tax. I almost missed them. The space for them in the Martha Stewart area was empty, but I found a whole display of them in the main aisle. Thanks, Diane!
CABLE
And have you seen Susan's post about the six foot extension cable at ScrappinCricut? I read her post last Thursday and immediately ordered one. Within a couple of hours, I received an email that it had been shipped and it was in my mailbox yesterday. What great service!
Now, I have to admit on this one that I wasn't exactly sure what I was ordering. For some reason, it just wasn't computing even though Susan showed a picture of it plugged up to her Gypsy. You may understand it completely, but I thought I'd show you a few more pictures.
OK, the end on the left is exactly like the end of the Design Studio cable that connects the computer to the Cricut. That end plugs into the back of the Cricut.
And the end on the right is like the back of the Cricut. I can now plug the Design Studio cable into the extension cable.
Or I can plug my Gypsy into it.
So now I have plenty of cord for either Design Studio or the Gypsy AND I don't have to go to the back of the Cricut to change them out. I can just unplug one from the extension cord and plug the other one in.
Thanks, Susan and Kendra!
CELEBRATE
Well, the Celebrate part of the post isn't a celebration and you may already be aware of this, but I wasn't. When I was working on Maddy and Aidan's birthday cards, I had problems with the Celebrate with Flourish cartridge. Sorry I forgot to mention it in that post.
The part of the cards using that cartridge was the "happy birthday" on the inside. When I cut that page, Design Studio asked me to insert that cartridge even though it had read my Jukebox. I clicked ok and it did not cut that part. After much playing with it, I finally cut those parts the "old fashioned way" (without Design Studio).
I tested my other two Lite cartridges and had no problems with them but could not cut anything from Celebrate with Flourish using Design Studio. I stayed home this morning waiting to hear from my appliance repairman about my clothes dryer, so I called PC while waiting. Lindsey had me uninstall Design Studio, clear the settings, reinstall Design Studio, update my firmware and run the latest font update again. Nothing!
Well, I heard from my repairman in the meantime, so I needed to get to work and didn't call PC back until I got home this evening. This time I got Ashley. As soon as I told her the problem, she said that they are aware of the problem and that IT is working on it and hopes to have a fix for the next Design Studio update. UGH! But at least they are working on it.
Hope you're having a good week,
Jill
Monday, June 28, 2010
One
Kay and Angie came to my house a few weeks ago for a weekend of cropping. Virginia joined us on Saturday for a while too. It was rather a crazy weekend as I was hostess for our CTMH group and we ended up having it at my house instead of the school where we usually meet. And then I had to leave for a little while for a hair appointment I couldn't change because it was the last day my hairdresser was working before his 3 week vacation. See, I told you June was busy.
Anyway, Kay was working on the portraits from Aidan's first birthday. Can't believe he'll be 2 this week. I told Kay that I thought she needed a One mesh. She loves the mesh pages, and that's the main reason she wanted an Expression. However, she hasn't played with Design Studio enough to want to tackle making one, so guess who got volunteered.
I grabbed my Gypsy on the way out the door for my hair appointment in case I had a few minutes to wait. I started a page with a bunch of 1's, but then I stumbled across the design on Graphically Speaking where they have already made a mesh of 1's and one's. By taking 4 of these and doing some welding, stretching and scrunching, I made a great full page mesh. Sure made it much easier.
I didn't get pictures of her layout, but she used one of these on the left page and just one strip of it on her right page. Too cute!
Wish I had time to learn the cartridges. A couple of years ago I could pretty much tell you what was on what cartridge. I don't even know what all is available these days. Thank goodness for Linda's cheat sheets and our keyword search ability on DS and Gypsy.
One Mesh
If you use this, I highly recommend cutting it twice in order to get a cleaner cut with all of the corners and stuff.
Jill
Sunday, June 27, 2010
Prince and Princess Birthdays
Kay and Kate were kind enough to combine Maddy and Aidan's birthday parties into one this year, so I just had to make one trip. AND they were kind enough to also plan the party theme around the darling frames I found at Hobby Lobby. :o)
Well, with everything going on, I didn't do so well at getting things done ahead of time this year. But at least I got them done.
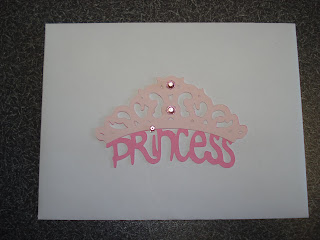
I wanted Maddy's card to be girly, so she got the castle, the princess and the bling.
Stickles on the flags and gems all over.
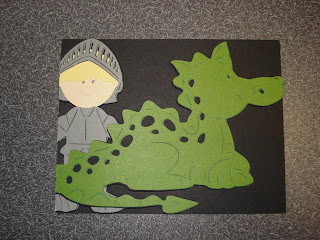
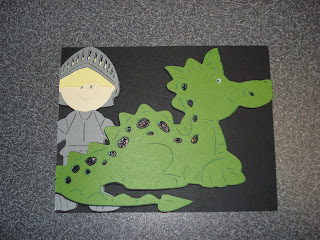
But I wanted Aidan's card to be more "manly", so I had to stay away from the castle. He got the dragon, the knight and just a little bling.
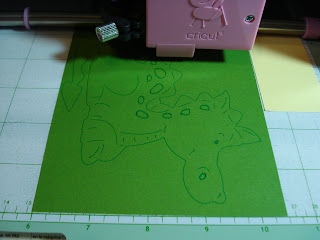
I first cut the dragon but wasn't happy with it. So I pulled out my Cri-Kits to give them a try. I drew the dragon with green ink and the knight's armour with black. I ordered the gel pens a few months ago but hadn't taken the time to use them. Now I'm ready to order more. I have the Reg. and Neon set.
After all was said and done, I still wasn't happy until I added some stickles to the dragon's spots and gave him a google eye.
Aidan's present was this cute little castle. There's also a knight, a dragon and a catapult that goes with it.
But Kay used them on the cake.
And a little bling for the envelopes:
Oh, and Maddy received Green Eggs and Ham and The Cat in the Hat.
I made 2 files for each card and a file for the crowns that I put on the envelopes. You only need to cut the pages with "cut" on the tabs. Everything else is for previewing the designs.
Crowns
Castle Card
Inside of Castle Card
The Dragon Card also has 2 pages to draw if you are using the pens. One page is for the dragon and one for the armour. Remember to load a pen, load the mat, draw one or the other, change pens, draw the other, load the blade housing, and cut all without unloading the mat between.
Dragon Card (This is the corrected file.)
Inside of Dragon Card
The solid black dragon goes over the knight because he shows through the spots on the green dragon.
The kids didn't care about their cards, but they'll look nice in their scrapbooks. And we had a great time at their birthday party. Happy Birthday Princess Maddy and Prince Aidan!
Later,
Jill
Subscribe to:
Posts (Atom)